According to the U.S. Chamber Commercial Construction Index, construction companies have been facing more challenges since the pandemic.
The majority of them have difficulty finding skilled labor, and nearly all are experiencing material shortages. As a result, it’s no surprise that two-thirds of contractors expect project delays.
Although hold-ups are common in the construction industry, they cost you time and money.
As a business, you should aim to keep your construction projects on track, identify ways to stay on schedule and have the essential resources and people on hand.
Let’s learn how you can accomplish all of this!
In this article...
Create a Work Breakdown Structure
A good work breakdown structure (WBS) will act as the foundation for your building project.
According to The Constructor, WBS is “a tool for simplifying the complexity of a particular task of a project,” where you keep dividing the tasks into smaller tasks until you reach the one you cannot break down further.
In other words, you will split activities in detail, ensuring you capture 100% of the required effort.
With a WBS, you will not be improvising along the way and doing things from memory.
Instead, you’ll rely on the document that splits the entire project into sections, down to the smallest categories.
If the definition seems too abstract, here’s a visual to help you understand WBS a bit better.
The U.S. Department of Energy breaks down general construction into chronological processes, starting with conceptual design.
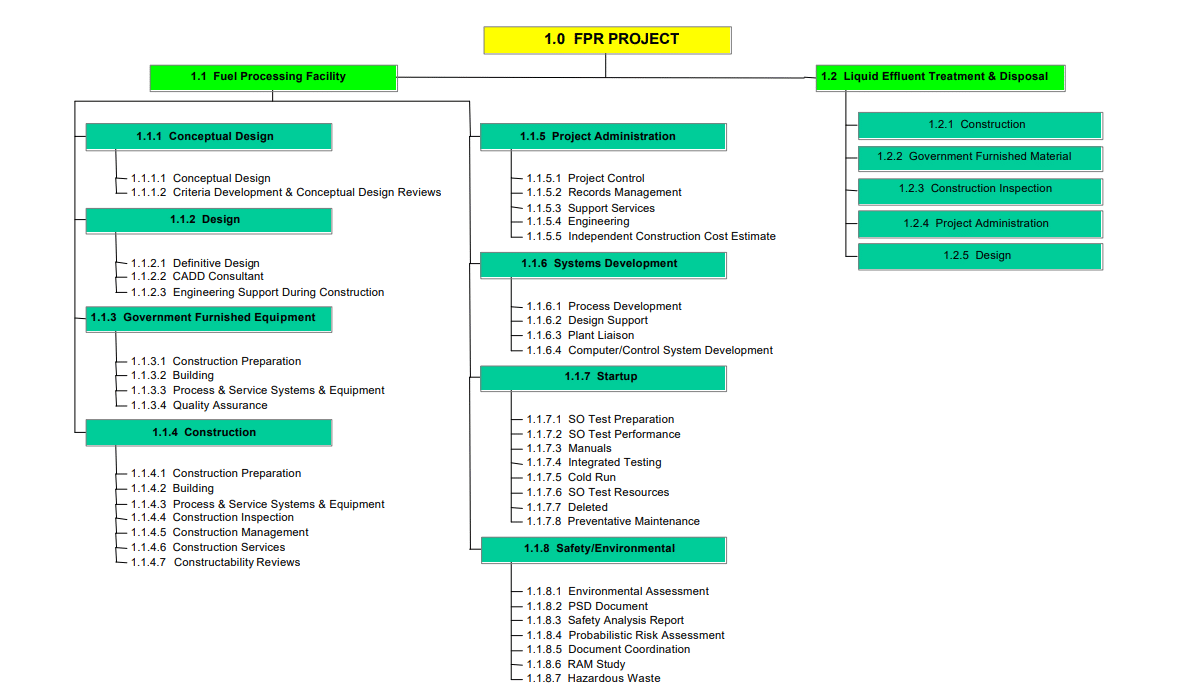
The processes are then split up into chronological sub-processes., which are further separated into tasks that the team must complete one by one to finish the project.
WBS increases your productivity by outlining your subsequent actions and ensuring you don’t miss a single assignment.
A good work breakdown structure also details the materials required to finish a task by the deadline, so you’ll know what to expect at each stage of your construction project.
Therefore, you’ll be able to stick to your deadlines and avoid costly delays.
Here’s how to create a great WBS that you can reuse for similar projects.
Think about a successful project you’ve completed in great detail and write down the steps you took. Plan Academy suggests you start with your process milestones at the top level of the WBS.
Then, work your way down and list the time necessary to complete each task.
For example, you can start with the Design category and explain the steps you took to devise a project and how long it typically takes.
To ensure you finish the project on time, repeat this process for each step.
It’s a good idea to check with your team to see if you’ve overlooked anything.
Because your employees perform these tasks daily, they can easily spot errors such as a lapse in chronological order or a missed step.
Once you’ve double-checked your WBS, you can use it to stay right on track to meet deadlines.
Work Out Your Critical Path
The critical path method (CPM) uses a chronological flow of each construction project activity to emphasize the most vital tasks for completing the project, showing what comes before and after and how long it takes.
CPM separates vital and non-critical jobs, letting you see where you can afford to be late on an individual task but stay on schedule in general.
In other words, a critical path is a sequence of tasks that must be done in a specific order for a project to be successful.
The HBR CPM example outlines the activities and the time required to complete each one.
The activities that aren’t on the critical path are also displayed in chronological order, ensuring that you do them in the correct sequence.
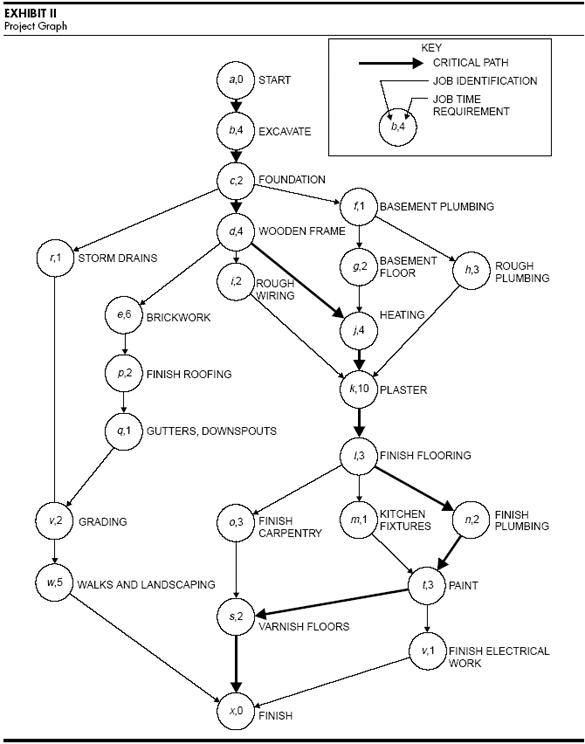
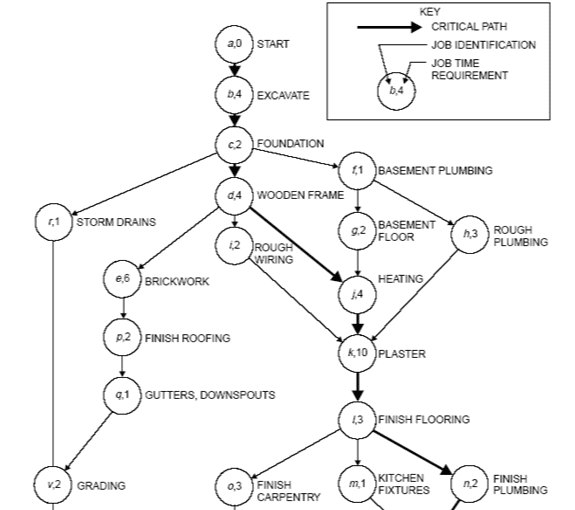
In this case, the critical path implies that the contractor cannot begin work on the foundation until the excavation is complete.
Still, they can start construction on the wooden frame, storm drains, and basement plumbing simultaneously.
However, note that the wooden frame is crucial for the further development of the project.
To visualize construction activities, criticality, and timeframe, most construction companies use a version of the Gantt chart.
This chart type depicts the project schedule and explains how various tasks are interconnected.
Here’s an example from RepOne that shows the timeframe of activities using a calendar at the top.
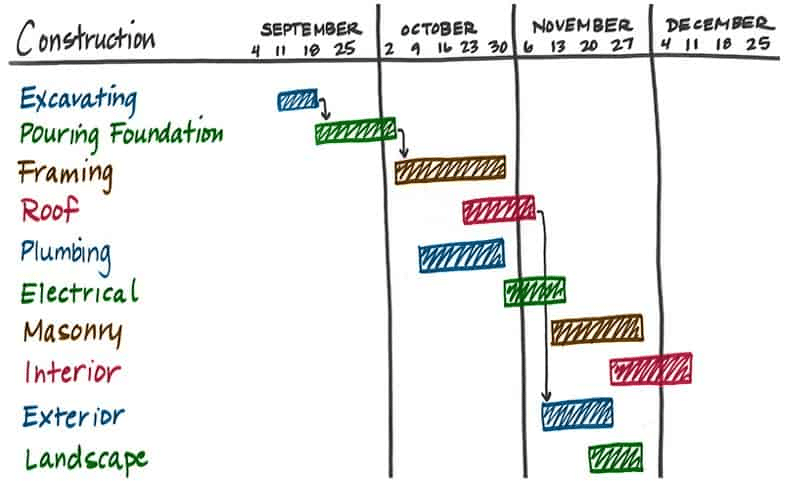
The chart lists the activities and specifies when they begin and end on the left.
In addition, it shows which tasks must be completed in order. In this case, the critical path consists of excavating, pouring the foundation, framing, roof, and exterior.
You’ll have a good idea of when to start and finish each task because the critical chart already displays the time required to do it, which will help you stay on track.
For example, suppose your organization only has one excavation expert.
In that case, you’ll utilize WBS to see when this expert will be needed for each project, spotting any overlaps and rearranging as necessary to avoid delays.
CPM will assist you in completing your projects on schedule because it will show you what you need to do and when.
Don’t Forget to Include Float in Your Schedule
When you want to be sure you’ll stick to your project schedule, don’t forget about float!
Float or slack refers to how long you can put off a task before it affects other tasks or the project.
There are certain vital activities you can’t delay because other tasks rely on them.
Non-critical activities frequently have more float, so you can start late and complete the job before the deadline.
If you’re not sure how that’s possible, we’ll show you using the storm drain activity from the HBR graph.
That task is not crucial, but it must be completed before grading can begin. However, so do the wooden frame, brickwork, roofing, gutters, and downspouts, as visible below.
What does this mean?
You can begin working on the storm drains as early as the sixth day of the project, shortly after the foundations have been laid.
Because the activity only lasts one day, you could be done by day seven.
However, if you look at the graph again, you’ll notice that the accounted-for float time for this activity is 12 days, which is how long it takes to complete the other tasks.
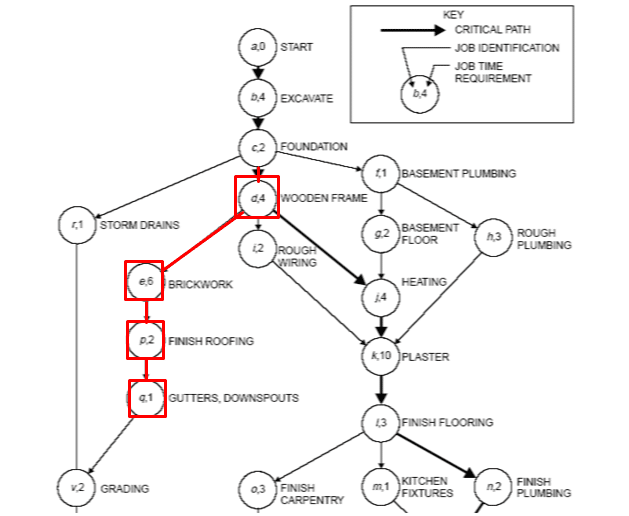
Therefore, even if you start the storm drain tasks on the 12th day, you will complete them in time to grade.
Some construction businesses incorporate float into their project planning. For example, float days are visible in Wikipedia’s example of a critical path schedule.
The crucial path in question includes the duration of each task, as well as the earliest and latest start and finish times.
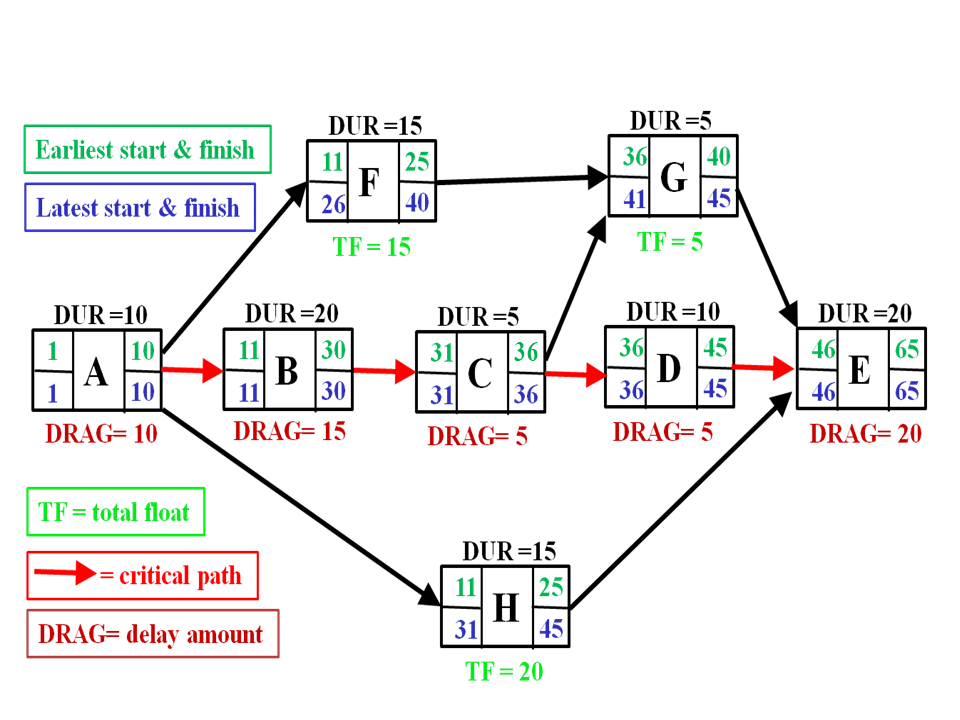
As evident, some tasks, like A and B, don’t allow float.
On the other hand, task F can be finished within 11 days, but it has a 15-day float period, which means the contractor can start this task later without affecting the entire project or the subsequent task G.
Always know how much float you have for specific tasks and the entire project, regardless of the approach or mode of project scheduling you utilize.
You’ll be able to complete the project on time this way.
Connect Each Activity to Resources
Resource planning allows you to have materials and people ready for each task, allowing you to stay on schedule.
Consider the following scenario: you need to finish the flooring tomorrow, but the only professional available is working on another project until next week.
You postpone the activity, but when the specialist arrives, you learn you no longer have the essential equipment since someone else is using it.
Once again, your project is experiencing a delay.
Unfortunately, businesses that do not prioritize resource planning do not have to imagine this.
To avoid this scenario, start managing construction resources such as personnel, building materials, and tools and equipment.
Project management solutions allow you to plan and organize the personnel you require for your projects.
Consider using one of these purely to keep track of your employees and where they are working at any time.
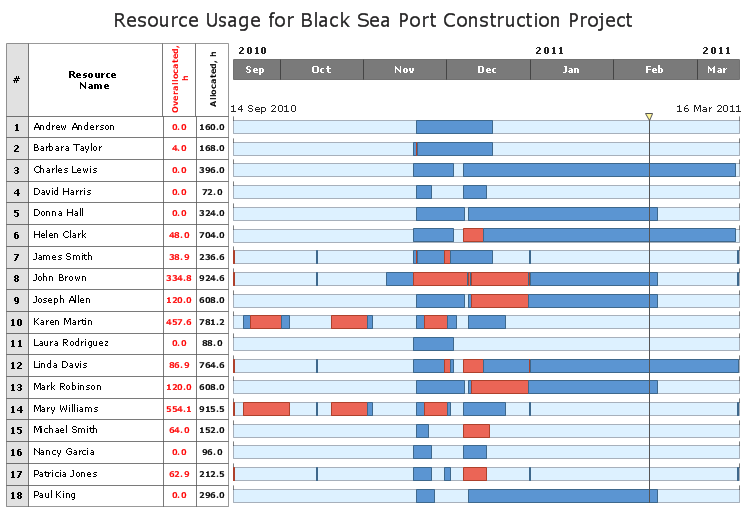
That way, even if something unexpected occurs, you can look at the overview and see which worker is or will soon be available to assist, minimizing task and project delays.
The same thing applies to materials and equipment management. Software like GoCodes Asset Tracking helps you tag the assets and enter them into the system, along with their location in your warehouse.
When someone needs to check the equipment or materials out, they will use the app.
Tagging software gives everyone else real-time asset data, including the current user and general location.
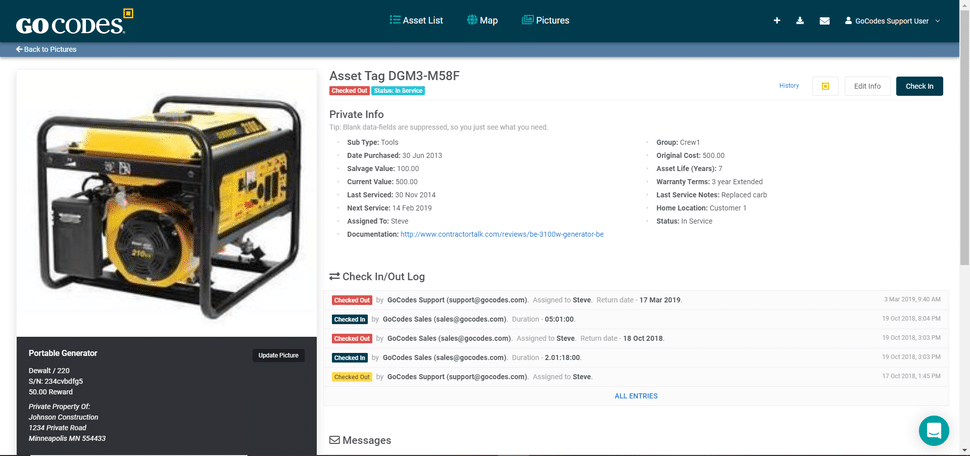
The equipment scheduling option lets you schedule a piece of equipment or materials months in advance. As a result, you’ll always have the right tools and equipment for the job.
If you train everyone to schedule assets on time, you will quickly identify project overlaps and work around them.
However, staying on schedule with your construction project will not be possible if you don’t manage your resources well.
Create Contingency Plans for Your Project Schedule
The unexpected can always derail your project, so set money aside for it.
Construction contingency funds are money set aside for costs not previously acknowledged or planned for in the project schedule.
In other words, contingency exists to cover the unexpected rather than routine activities. According to DAE Group, contingency is “insurance against unforeseen costs.”
The Group also advises setting aside 5-10% of the total construction budget for contingency. You’ll have enough to cover your expenses without going over budget.
To avoid wasting money on unnecessary purchases, you will need to establish rules for when and how to use the funds.
Expecting the unexpected sounds impossible, but it’s not that difficult if you have some project experience. Just think about everything that has gone wrong in your previous projects.
It could be several things, including:
- Lack of materials or equipment
- Labor shortage
- Illness
- Power or water outage
- Bad weather conditions
- Inability to acquire a permit
Any of these scenarios can cause a delay in your project, so it’s wise to be prepared for them and include them in your plans.
Contingency plans usually come with detailed instructions on situations that warrant using these funds.
Not every delay requires dipping into these funds, so brainstorm potential scenarios ahead of time.
For example, the State of Colorado’s contingency plan includes natural and artificial risks, including terrorist hazards, epidemics, and infestations.
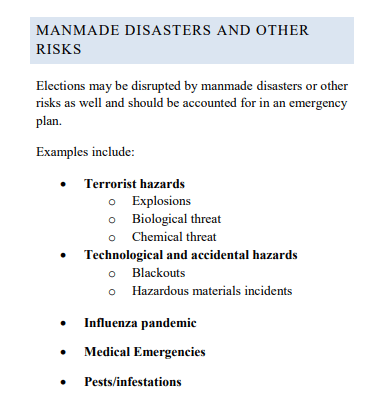
The plan then lists available resources and courses of action in each case. These details give project managers the knowledge necessary to put the contingency funds to use.
Let’s say you need to start excavating today, but you don’t have an excavator. Someone might want to use your contingency funds to rent the machine and start working immediately.
But, if there is an option to get the excavator from another project in two days and use two days of float, it is less costly and equally productive.
After all, float means the final deadline won’t be affected, and you will stay within budget.
Therefore, write down possible scenarios and procedures for contingency funds instead of using them for every minor inconvenience.
Conclusion
Since staying on time will save you time and money, it should be a priority for all your construction projects.
To ensure you meet the deadline, you should use a work breakdown structure, and be aware of what the critical path entails, as well as the specific and overall float.
Furthermore, it’s important to have a firm grasp on which resources you need for which activity, and have solid contingency plans.
When you meet these requirements, you will be more effective at construction project planning, resource, and time management, increasing productivity.


