Whether you’re a small contractor, a construction project manager or anyone else tasked with organizing construction tasks, you know that planning a schedule can be complex.
This makes it easy to miss something in the process, which can be intimidating.
If you want to ease this process and create a realistic and robust construction schedule from scratch, simply follow these 8 steps.
In this article...
Research the Project Thoroughly
Research helps you get the big picture of the project at hand. To understand the project requirements, you’ll need to involve the key stakeholders.
This step will produce clear project deliverables and make scheduling more realistic.
It goes without saying, there’s a lot that goes into construction projects.
For instance, even a “simple” bathroom renovation requires the engagement of multiple materials, equipment, works and tradespeople (plumber, electrician, tiler, carpenter, etc.), thus also requiring a schedule.
Going bigger, let’s look at the time required for constructing a house because that’s where, as a McKinsey study shows, schedules are typically underestimated by at least 20%.
According to the 2021 Survey of Construction by the U.S. Census Bureau, the average completion time of a contractor-built home is 9.4 months, as highlighted here.

You can also see a steady rise in duration, while the average remains around seven months.
However, recent global developments have led to supply chain breakdowns and rising prices, causing delays and wreaking havoc on even the best-prepared schedules.
That’s why initial research, preparation, and planning are critical for robust scheduling.
And talking to the key stakeholders and gathering as much information as possible about the client’s requirements, the architect’s vision, building code constraints, site conditions, required materials, labor, etc., will inform your schedule and make it more realistic.
Gather Information From All Subcontractors
In this step, you’re still doing research. Once you understand the key stakeholders’ requirements, it’s time to gather information from all subcontractors.
This will provide further crucial data for your schedule.
Let’s say you’re a small contractor scheduling a bathroom renovation. You already have the construction plan and drawings, so you understand the job.
Next, determine which tasks should be “outsourced,” i.e., what subcontractors you’ll need. Let’s say you’ll need a plumber, an electrician, and a carpenter.
And don’t forget materials, as they are also “subcontracted.”
And that’s just one bathroom. For larger projects, subcontractors can be divided according to, for instance, the type of services they offer:
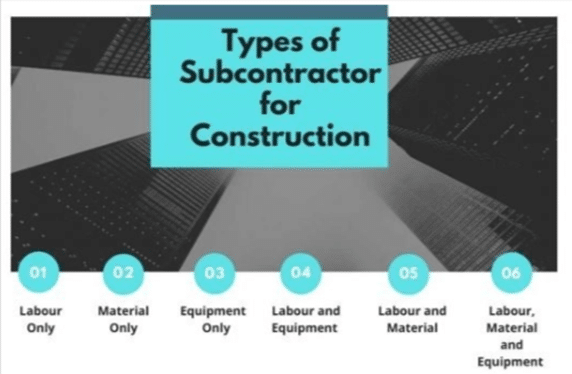
Nevertheless, once you have a list of subcontractors, contact each one to get their take on how long certain tasks will last, including potential supply or installation issues.
It’s also good to ask about the best materials and practices, as well as professional tips, as these could prove useful later.
However, be careful not to take their estimates too literally. People can forget to take potential setbacks into account, thus underestimating the required time.
So, if something seems amiss, consult other professionals, compare their estimates, and come up with an average duration. And even then, factor in some extra time just in case.
Thus, gathering information from all subcontractors gives you further valuable data to use in your schedule. And quality projects are based on quality data, right?
Create a Detailed List of Tasks
So, in the first two steps, you gathered a lot of information from project stakeholders and subcontractors.
Now it’s time to create a detailed list of tasks. This is where the backbone of your schedule starts to emerge.
You probably already have a rough list of tasks at this stage, but it needs to be refined.
In other words, each task needs to be broken down into steps, supplemented with details such as the amount of the required labor, materials, construction equipment and machinery, etc., along with the estimated duration of each particular task.
The key here is to be detail-oriented and systematic.
To divide each task into smaller ones, project managers often use the Work Breakdown Structure (WBS).
In its most common form, this methodology defines project deliverables, or the results that a team is expected to produce.
Each deliverable requires one or more tasks to be performed.
For instance, in the example below, the project deliverable in the example below is a completed substructure of a family home.
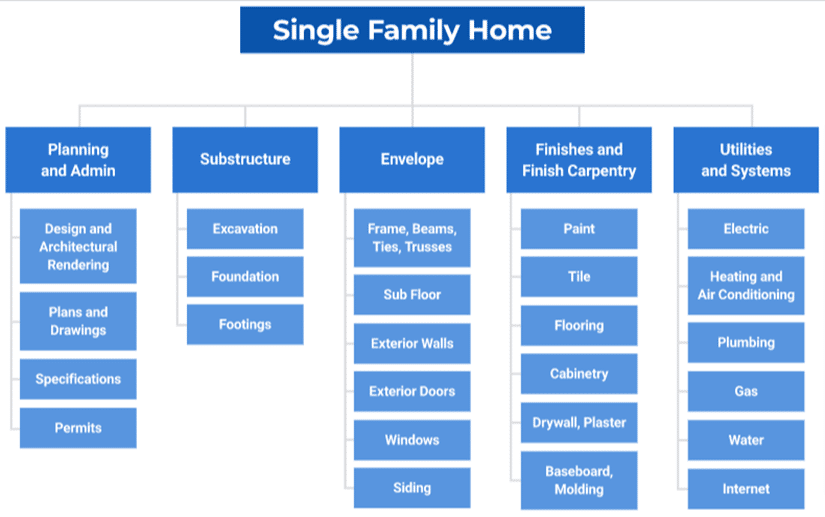
You can see that building the substructure for this family home will require excavation, foundation, and footings.
Thus, this one task is fittingly divided into subtasks that have to be completed in this phase of the project.
This method basically creates a list of all project deliverables and allows you to see the total scope.
It simplifies labor and material cost estimation and clarifies dependencies between different elements.
Whatever method you choose, the detailed list of tasks you create at this point will serve as the basis for your schedule.
Identify Possible Risks
The fourth step is to identify potential risks.
Although the information collected from stakeholders and subcontractors probably highlighted some constraints and dependencies, construction project risks need to be identified separately, as they’re often a reason why construction projects fail.
Anything that can negatively affect the project outcome, budget and schedule is considered a risk. We’ll just list the usual suspects that tend to derail construction schedules:
- undefined project scope
- change orders
- availability and cost of materials
- labor shortage
- construction site hazards
- equipment breakdown
- the weather
So, you need to identify and assess those risks and incorporate safeguards and contingencies into your schedule. However, with so many risks involved, the question is which are relevant.
That’s where a risk prioritization matrix comes in. A simple 3×3 matrix measures risks according to their probability and impact.
Or you can go for a more nuanced risk assessment like this:
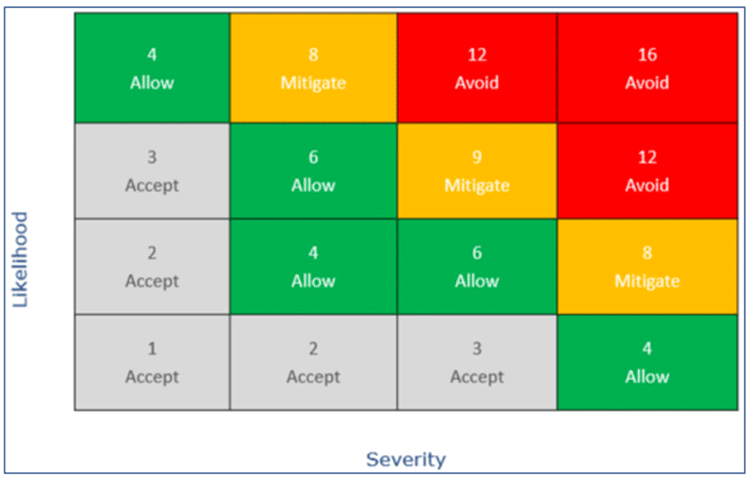
In this matrix, the risk likelihood and severity are combined and rated, where the most likely and most severe risks are awarded the highest score (16).
Colors and words clearly indicate what should be done (or not done) about them. And this is very relevant to your schedule.
In fact, this process will allow you to identify the project risks, evaluate their possible effect on its budget and schedule, propose mitigation measures, contingencies and workarounds and ultimately reinforce your construction schedule.
Choose an Appropriate Construction Scheduling Tool
In today’s world, there are many available construction scheduling tools.
Choosing the right one may involve some research and trial and error, but it can pay off in arming you with an updateable and flexible schedule that will be the foundation of the entire construction project.
Keeping in mind small-to-medium-sized contractors, we’ll focus on free and free-trial scheduling tools you can use to create an interactive and more accurate schedule.
You can use a pre-existing template or create a new one. Here’s an example.

This scheduling software allows you to create a Gantt chart, another commonly used tool to present a construction schedule visually.
You can import the list of tasks you’ve already prepared, and it will populate the timeline in seconds.
From there, you can specify the duration of each task, and the chart will show start and end dates. You can then add milestones, link dependent tasks, and insert subtasks.
Just from this example, it’s clear that different construction scheduling software simplifies the initial entry of tasks and their future changes.
It also helps organize and visualize a realistic construction timeline you’ll soon create.
There’s certainly plenty to choose from, and some may not be right for your project.
So, do some window-shopping and reviews-reading, or even try out a few free or free-trial scheduling tools.
Just like in scheduling, you should aim for functionality, flexibility, and efficiency.
Finalize the Project Scope
You collected the information, identified the risks, and chose an appropriate scheduling tool.
Your list of tasks is ready to occupy the project timeline. However, there’s one more step—finalizing the project scope.
The project scope is usually a written document that describes a construction project’s outcome, deliverables, milestones, tasks, and responsibilities.
Assuming that everything is done correctly, the client defines their needs and wishes and the architect, while the construction team and other relevant stakeholders define the requirements of the project.
Collecting info from stakeholders is an important prerequisite for making the construction schedule.
And the cornerstone of your initial research is defining the scope of the project. In complex projects, creating a detailed scope may require professional consultants like Horst Construction.

In their words, “creating a clear, detailed scope of work is one of the first steps to turning your vision into a fully functional building.”
However, even they say that the scope is not set in stone. That’s why, after the first five steps, it’s crucial to finalize the project scope.
It’s time to use all that scheduling information you collected on the way and inform other stakeholders of any budgetary constraints or other dependencies and assumptions and any big or small changes that should be made to the project scope or schedule.
It’s essential that all stakeholders agree on the final scope of work before the works begin.
Yes, there will still be small adjustments, but avoiding major change orders saves both time and money. And makes your schedule more accurate and robust from the outset.
Determine a Timeline for All Tasks
The scope now finalized, this is the step where it all comes together, and your construction schedule emerges.
Setting a timeline for all tasks is the glue that will hold your schedule together.
So, now all the tasks are listed and prioritized.
The required labor, materials, equipment, and duration of each task have been estimated. This will give you a tentative estimate of the total duration of the project.
For easier organization, a project is usually broken down into phases, which you already did, using the work breakdown structure. The end of each phase is a milestone, as shown below.
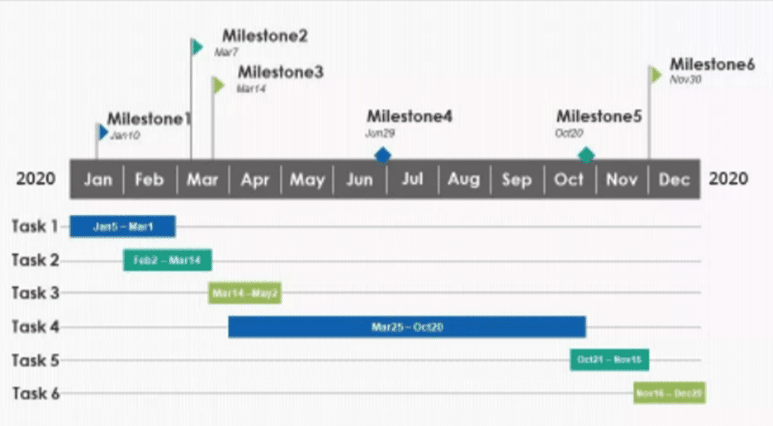
Milestones serve as control points when the project is underway. Now it’s time to determine the sequence of actions required for smooth performance of the project from start to finish.
The most widely used method to visualize this sequence is a Gantt chart we already mentioned in Step 5. It maps all tasks along a timeline.
Now you need to add their estimated duration (start and end dates) while keeping in mind the necessary order of actions together with all dependencies and constraints.
Then all the tasks need to be assigned.
This means checking the actual availability of subcontractors, if any. If all is well, the project kick-off date is set, and your schedule is ready for take-off.
As said, most scheduling software you select will do all the above and even more.
And other software may be useful when the project is running.
For example, it’s hard to keep track of all tools and equipment when construction is underway. That’s where GoCodes Asset Tracking comes in.
Our affordable and simple solution allows you to track your equipment and, among other things, schedule preventive maintenance to prevent breakdowns and avoid downtime.

Thus, determining a timeline for all tasks is the last piece of the puzzle. All previously collected information now makes sense.
The schedule is set, work is assigned, and your job is done. Well, not really. In a way, it just started.
Update Schedule Regularly
As expected, with so many moving parts, construction projects and their schedules are bound to change.
This means that the schedule must be regularly reviewed and updated to compensate for deviations and mitigate risks.
You need to monitor the progress and, if a task is delayed, take action to make up for that.
For example, you can pull resources from tasks ahead of schedule, use built-in safeguards or spend some of that extra time you allocated in the schedule.
The important thing is to take steps so that the task (and sometimes the whole project) gets back on track.
As said, reaching project milestones on time serves as a checkpoint for the project’s progress.
You can monitor, review, and update the schedule by using the scheduling tool you selected for your timeline.
Or you can use construction management software that helps you stay on top of all aspects of a construction project.
Again, the number of choices offered online seems endless, so we’ll focus on highly recommended solutions for small-to-medium-sized construction businesses.
Mind you, they offer different features and subscription packages, so research is vital.
That said, here’s how these often-recommended tools look when their search results over the last 12 months are compared.
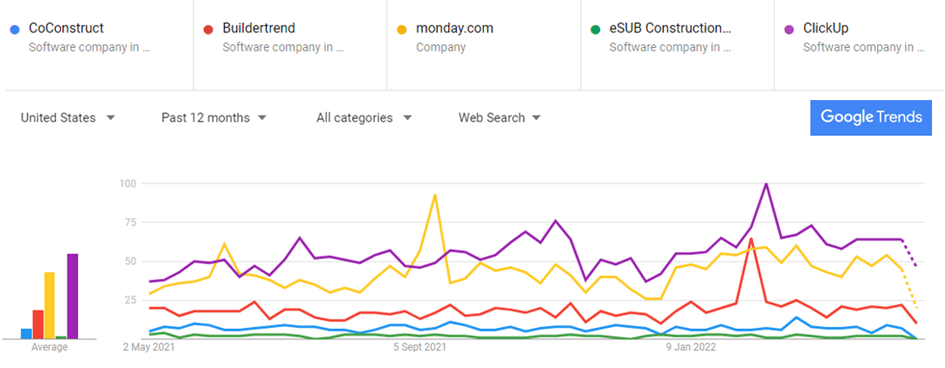
The right software platform can help coordinate all of the components of multiple construction projects, depending on your needs.
So, regularly updating the schedule is a natural step, as with constant oversight there’s less chance that something will go wrong and more opportunities to fix it when it does.
Just one more thing. Once a project is completed, don’t forget to compare the initial and actual schedules and take the lessons learned to your next project.
Conclusion
A well-planned construction schedule is the backbone of the entire construction project.
It ensures the efficient use of all resources, minimizes risks of time and budget overruns, and can detect issues before they arise.
Having gone through these steps, we hope they’ll help you create a construction schedule that will be your own blueprint for success.


