
Are you a seasoned quantity surveyor looking to further improve your material takeoff game? Or are you a beginner estimator seeking a deeper understanding of the process?
Whichever your expertise level may be, this article is for you.
It delves into each of the seven steps involved in generating a precise, comprehensive, and accurate construction material takeoff—a must when it comes to project planning and cost estimation.
Whether you’re involved in residential, commercial, or industrial projects, you are bound to acquire some valuable insights from this article.
So, without further ado, let’s dive in.
In this article...
1. Choose Your Material Takeoff Method
There are two approaches to construction material takeoff (MTO): digital and manual.
Since each method comes with its own set of advantages and disadvantages, the choice between them will depend on your specific needs and circumstances.
The manual method involves a hands-on process of reviewing blueprints, interpreting floor plan symbols, counting materials, and manually inputting data into a spreadsheet.
As such, it:
- is straightforward
- has low upfront costs
- offers a deeper understanding of construction drawings.
However, material takeoff is a complex process, and doing it manually can be extremely time-consuming and prone to costly mistakes.
Let’s face it: it takes only a small distraction or typo in an Excel sheet to compromise the accuracy of the entire takeoff.
A survey conducted by Acuity Training delves deeper into the unreliability of Excel, with respondents admitting they’ve witnessed spreadsheet errors costing companies considerable amounts of both money and time.

In intricate processes like construction takeoff, this proneness to human error becomes even more prominent, potentially leading to issues such as budget overruns and project delays.
Still, given its simplicity and cost-friendliness, the manual approach remains a viable choice, particularly for smaller, clear-cut projects.
On the other hand, digital MTO includes using specialized takeoff software for automatic material quantification, making the process more efficient, quicker, and highly accurate.
One significant advantage of the automated systems highlighted by Abe Schainker, Senior Vice President of Cost Management at JLL, is the ability to access and use historical data for future predictions—something Excel simply cannot do.

This is precisely where that accuracy and speed come from.
The software sees what you can’t, and uses that data for material quantification. And it does so in a couple of moments!
That being said, digital MTO isn’t without its challenges.
While it’s definitely more powerful, the software may not be as user-friendly as spreadsheets, requiring some trial and error before mastering.
Therefore, research is crucial when selecting digital takeoff solutions to avoid systems that are either too challenging for you to handle or even unsuitable for the job at hand.
For instance, you wouldn’t want to make the mistake of buying residential construction software when working on commercial construction projects.
The bottom line is this: be sure to carefully weigh the pros and cons of both methods before making a decision.
Consider your project’s size, complexity, and proficiency with the chosen method to arrive at a solution that best suits your needs.

2. Review the Project Documents
Project plans, blueprints, drawings, and other documents play a crucial role in facilitating MTO processes.
They assist in visualizing the entire project, in turn providing a comprehensive grasp of its scope and material requirements.
In the table below, you’ll find key types of construction drawings, each contributing to an understanding of different project facets.
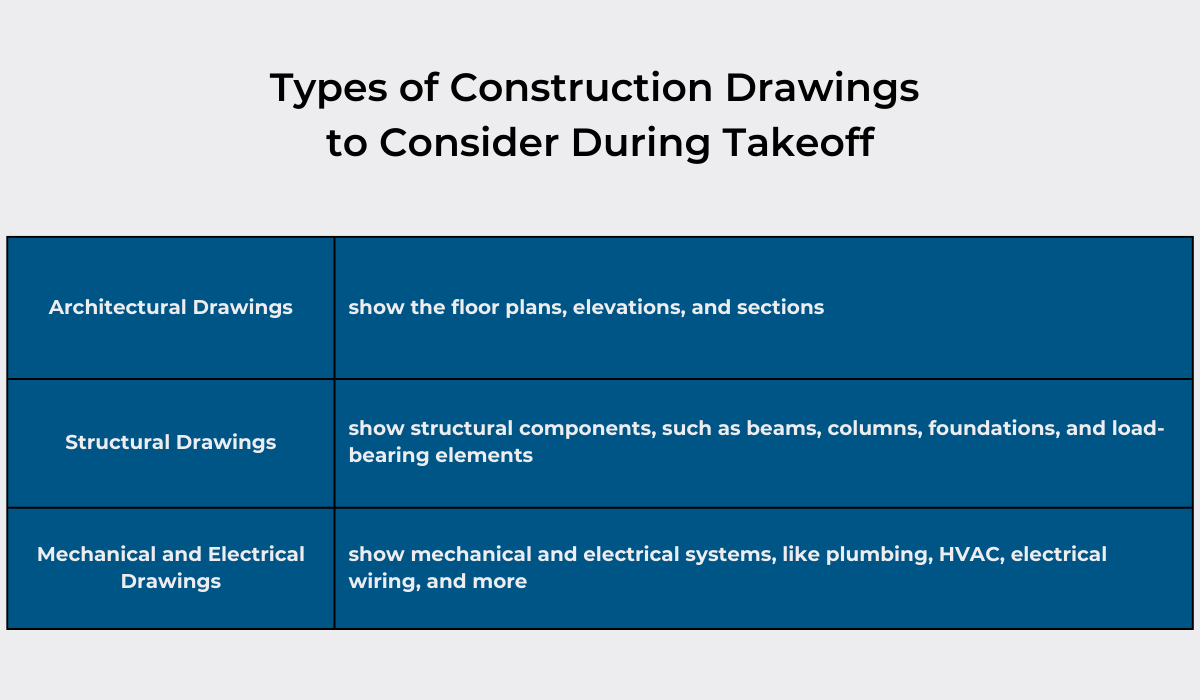
Acquainting yourself with these will guide you in selecting the most suitable materials for the job, laying the foundation for overall success by improving cost control, ensuring timely completion, and enhancing the quality of the final product.
At the end of the day, that’s precisely what material takeoff is all about.
In fact, this is where the term “takeoff” originates from, too.
In the early days of construction takeoffs, constructors would look at the symbols on the blueprints, count them, and record them on a list, thereby “taking them off” the plans.

We believe this only further underscores the essential nature of reviewing project documentation in the MTO process.
Skipping this step directly translates to inaccurate takeoffs.
So be sure to get your hands on those documents as soon as possible.
If you are conducting takeoff manually, you’ll need physical copies of all relevant documentation, and then you’ll have to review it by hand.
Alternatively, if you’ve chosen the digital approach, scanned versions will suffice, as they can be easily uploaded into the takeoff software.
3. Identify the Required Materials
During this phase, you’ll assemble an exhaustive inventory list encompassing all the materials needed for the seamless execution of the job.
Remember, this list will later be used for material quantity and cost estimation, so precision is paramount at this stage.
Therefore, it’s best to avoid vague generalizations when listing materials.
Instead of generic terms like “flooring”, for example, break it down into specific categories such as tile, hardwood, and carpet.

Even if you require multiple instances of the same material, like two types of tiles, create distinct sections for each variation.
Attention to minute details, such as kitchen cabinet handles, drawer pulls, and similar small features, is another must.
Neglecting to include these items now could result in unforeseen costs once the project is already underway.
The efficiency with which you accomplish this task hinges on the chosen MTO method.
If you opted for the manual approach, be prepared to count each item by hand, which will, naturally, take some time.
If you’re going to be using specialized takeoff software, on the other hand, the process can be significantly expedited.
You’ll simply import the drawings, select a symbol, define its meaning, and let the automated solution do the rest.

It’ll identify all instances of the symbol and provide you with the total quantity in a few moments.
However, it’s still important to personally review the final results and fix any errors the system may have made.
When it comes to construction takeoffs, an extra layer of caution is always a good idea.
4. Measure the Various Components of the Project
As you are aware, designers make blueprints to scale.
Therefore, during this step, it’s your responsibility to scale out and precisely measure all components of the structure you’ll be building.
But don’t think this task is just an exercise in math and geometry.
Its purpose is to lay the groundwork for the most accurate estimation possible in the subsequent stages of MTO.
For example, when doing wall area takeoff, calculating walls’ length, thickness, and height will help you decide the amount of drywall or paint needed for the project.
The same principle applies to other project aspects like flooring and roofing.
Surfaces such as walls, floors, and ceilings are typically calculated in terms of square footage or meters, using formulas tailored to the surface shape (rectangle, triangle, etc.).
Consider, for instance, the calculation of the area for a rectangular floor.

The area (A) is derived by multiplying the length (L) by the width (W) of the floor.
A little pro tip here: when working with irregular surfaces, break them down into smaller, more manageable shapes, as shown in the image above.
After you’ve finished measuring all the project segments, it’s finally time to determine material quantities.
5. Calculate Material Quantities
With the list of materials and all the measurements ready, you’ll have a solid foundation to calculate the required quantities for each material.
Depending on their type, you’ll have to use several different units of measurement.

For example, for countable items, such as door hinges, window frames, light fixtures, and so on, you’ll use the count.
Length, on the other hand, is employed for materials like lumber, conduit, wire, and ductwork and is typically measured in linear yards or feet.
For concrete, sand, gravel, or paint, you’ll use volume, calculated in cubic feet or yards, while for flooring, roofing, or drywall, as discussed earlier, the calculation will revolve around the surface area that the material will cover.
Finally, you may also need to include the weight in the takeoff, especially in larger projects where the logistics of transporting these items to the job site could incur significant expenses.
Determining the weight of the materials can then help calculate the cost of shipping.
Once you complete this step, it’s crucial to double-check (or even triple-check) everything for accuracy.
The saying “measure twice, cut once,” though relevant to carpenters, equally applies to construction material takeoffs.

6. Factor in Material Wastage
Before tallying the costs of materials, there’s an additional factor to account for: material wastage.
Essentially, wastage refers to any material that’s left unused or discarded during the construction process.
As you probably already know, such waste, due to the nature of the construction work itself, is inevitable.
Some of the factors that contribute to the problem are:
- Poor planning
- Suboptimal design
- Mishandling by workers
- Weather conditions
- Human error
- Cutting and trimming
Given that these occurrences can’t be entirely prevented, the best solution is to incorporate allowances in the takeoff to mitigate potential problems like unplanned downtime and delays.
In this context, an allowance pertains to a designated amount of money intended to cover material losses resulting from unforeseen circumstances.
This financial cushion addresses changes, discrepancies, or issues not initially accounted for in the contract.
So, how do you determine how much to set aside?
Well, it’s best to draw upon your own experience and knowledge, as well as consult industry standards.
Below, you’ll find recommended allowable wastage, along with common situations in which it typically occurs for various construction materials.
This might be useful to you when setting up allowances for the upcoming project.
| Cement | 3-4% | Cement can fly in the air when mixed with other materials |
| Structural steel | 12-15% | Wastage happens during cutting and bending |
| Coarse Aggregates | 6-8% | Some pieces may fall off during transportation |
| Tile | 1-2% | Tiles can break during work, but this rarely happens |
| Granite | 8-12% | Similar to tiles, it can break during work or transport |
| Reinforcement steel | 4.5-6% | Happens during cutting and bending process |
| Bricks | 3-4% | Mostly happens during transportation |
| Paint | 3-4% | May fall off when applied to the wall, but proper work behavior can control it |
As you can see, certain materials are more likely to be wasted than others.
That’s why it’s crucial to evaluate each material individually, consider possible wastage scenarios, and adjust your allowances accordingly.
This approach provides enough flexibility to operate without concerns about material shortages, while also avoiding excessive orders that could adversely impact the project’s overall profitability.
7. Determine the Costs
Typically, determining the final costs for the materials is achieved using a straightforward formula:
(Cost Per Unit) x (Number of Units Needed) = Total Cost
Assuming you’ve diligently completed all the steps we’ve outlined so far, the second component of the formula—the quantity of required units—should already be established.
You’ve calculated what you need and how much of it you need, so now, you can simply input that data into the equation.
However, the cost per unit is where things get a bit tricky.
In today’s dynamic market, where costs undergo constant and significant fluctuations, predicting construction material prices can be exceptionally challenging.

In such cases, your suppliers can be truly valuable allies, offering some industry insights or providing quotes that can be incorporated into your calculations.
They may even extend discounts for bulk orders, though it’s crucial to remember that these offers come with their own expiration date.
Therefore, ensure that the quote remains valid long enough for the bid to be accepted so that materials can be ordered on time.
After obtaining information about the price per unit, all that’s left to do is to total the costs.
Don’t forget to factor in additional elements such as delivery charges, taxes, and any other associated expenses related to material procurement.
Once you’ve done that, thoroughly review the results one last time before submitting the documentation.
Conclusion
Undoubtedly, the mastery of the material takeoff process stands as a vital factor in ensuring the triumph of any construction endeavor.
By following the seven steps we’ve outlined, you can achieve just that.
So, be sure to always pay attention to detail, engage in discussions with suppliers and other stakeholders to explore various possible courses of action, and prioritize thoroughness during your estimations.
Only by doing so can you achieve the most accurate takeoffs, directly contributing to the success of the projects you’ll be working on.


